
Creating a Masternode requires owning 10,000 PIV, running a specially configured online wallet with high uptime, and locking the 10,000 PIV using an offline wallet (that can leverage a hardware wallet like Ledger). This is a straightforward and elegant process that has been described in PIVX-community documentation, like this page explaining how to run a Masternode using a single-core VPS from Digital Ocean.
That online wallet with high uptime can be costly, though, depending on the configuration and provider, and this article covers how to run PIVX Masternodes inexpensively. Following this guide, at the time of its writing, you can run four Masternodes on a single VPS instance that costs $6.99 USD per month, giving a Masternode monthly cost of under $2 USD.
Acquiring a Multi-Core VPS
There are many multi-core VPS providers. A good one, used by the PIVX community, is Contabo. Contabo's multi-core VPS offerings are both compatible with running PIVX Masternodes and cost effective. Contabo will be selected for this illustration, where a four-core VPS will be used. These instructions would likely extend with minor differences to other providers and alternative multi-core configurations from Contabo.
Around 100 GB disk space is required to run four simultaneous PIVX wallets, and the option of 200 GB SSD, which at the time of this writing is the default for a Contabo four-core VPS, gives a comfortable margin. The complete VPS specs used in creating this document are the following:
- 4 vCPU cores
- 200 GB SSD
- 8 GB RAM
- 32 TB Traffic
On the Contabo website, contabo.com, start by selecting the VPS with 4 vCPU cores. Then pick a term length you like and pick a geographical location. Any location will work with the PIVX network. Select the 200 GB SSD option, and Ubuntu Linux 20.04 as the operating system. A single IPv4 address is adequate. These options should not add any extra fees.
After acquiring the VPS and getting notification from Contabo that it is running, you will be ready for the next steps.
Communicating with Your VPS
You will need to communicate with your new Contabo VPS using Secure Shell (SSH). There are several good, free SSH programs. PuTTY is very popular, and OSX has a built-in Terminal application supporting SSH. For creating this document, though, MobaXterm on Windows was used, as it provides a more data-rich interface. It can be downloaded here.
After downloading and installing your SSH software, configure the terminal settings using the IPv4 address given to you by Contabo when you acquired the VPS. You will by default log in using the username root and the password for your Contabo account. When you log in, you will have the Ubuntu Linux command line interface to use for the steps below.
Installing and Configuring Software for the First Masternode
Step 1
Start by installing security patches. This can be done with the following command at the Linux prompt:
sudo apt-get update && sudo apt-get -y upgrade
This command serves to update the VPS to recent versions of software and will give different results over time as Contabo changes its default configuration.
Step 2
Enable IPv6 on the VPS. A new IPv6 address will be used for each additional Masternode after the first. To enable IPv6, issue the following command (which will exit silently):
enable_ipv6
Step 3
Get the latest PIVX wallet software (5.4.0 at the time of this writing) using the following command:
cd ~ && wget https://github.com/PIVX-Project/PIVX/releases/download/v5.4.0/pivx-5.4.0-x86_64-linux-gnu.tar.gz
If the latest release is something other than 5.4.0, replace “5.4.0” with the latest version number in the two places it is mentioned in the above line and in similar places in the following steps - if past naming trends hold, this will work.
Step 4
Untar and unzip the file you just downloaded to install the wallet software:
tar -zxvf pivx-5.4.0-x86_64-linux-gnu.tar.gz
Step 5
Using your personal computer, generate a Masternode private key using the Secure PIVX Masternode Tool (SPMT) software. First, download the SPMT software from https://github.com/PIVX-Project/PIVX-SPMT, install, and run it. Then in the main window, click the “New Masternode” button to begin configuring a new Masternode. It will bring up the following GUI:
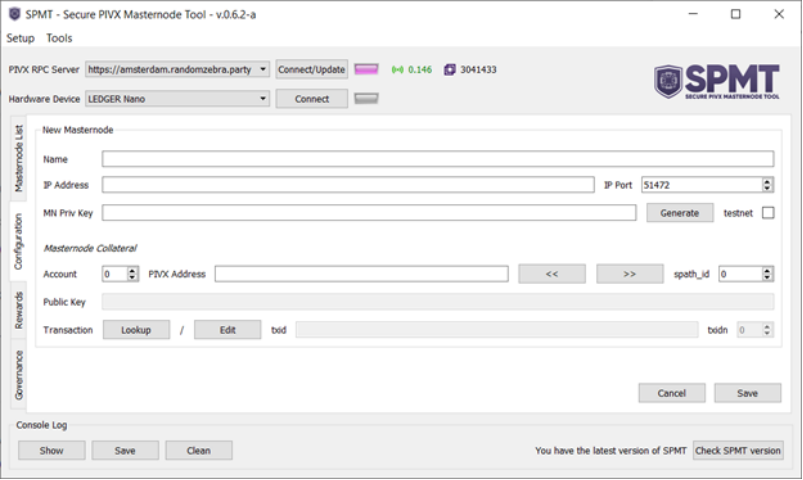
In this GUI window, click the “Generate” button next to the "MN Priv Key" box. This will create a long string in the box that resembles the following:
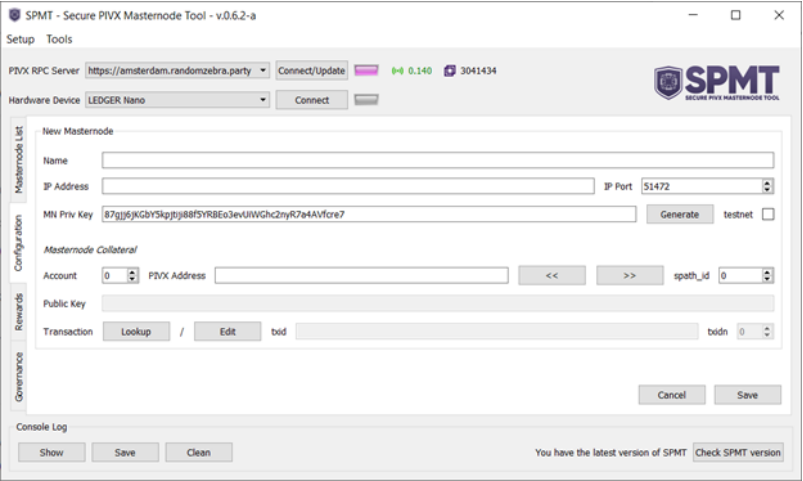
That string is a new, valid Masternode private key. Though the “private key” name suggests a need for extreme care, this string is not especially sensitive. It keeps others from using your Masternode software to earn Masternode rewards on their own 10,000 PIV, but your 10,000 PIV are not at risk from others learning it. The SPMT software will be used to generate Masternode private keys for the other Masternodes. You can either leave the software open or close it after capturing the Masternode string for use in a step below.
Step 6
Configure the wallet software to run as a Masternode. Do this by first creating and editing with vi, nano, or another text editor of your choice — vi, in this example — the configuration file with the following command:
mkdir ~/.pivx && cd ~/.pivx && vi pivx.conf
Then enter the following using vi (or an alternative of your choice) into the configuration file:
rpcuser=<username>
rpcpassword=<password>
rpcallowip=127.0.0.1
rpcallow=127.0.0.1
bind=<vpsip>:51472
rpcport=12345
server=1
daemon=1
logtimestamps=1
maxconnections=256
masternode=1
externalip=<vpsip>
masternodeaddr=<vpsip>:51472
masternodeprivkey=<privkey>
There are six entries in the above, marked with <> angle braces. These you will need to enter as unique to your configuration. The entries for <username> and <password> can be anything you like, but the password should be hard to guess. You could use “user” and something like “QaCkD1Ju5Tu2iq1On3”, for example. This password limits general outside interaction with the Masternode software. The three values for <vpsip> can be the IPv4 address (in the form xxx.xxx.xxx.xxx) for the VPS that can be read off of Contabo VPS purchase documentation, found on the Contabo website, or learned by calling "ip addr" at a Linux prompt. The value for <privkey> should be the string captured from the SPMT software in Step 5 above.
Step 7
Install the sapling parameters that are used by PIVX’s cryptographic algorithms using the following command:
cd ~/pivx-5.4.0/ && ./install-params.sh
Step 8
Start the wallet software using the following:
cd ~/pivx-5.4.0/bin && ./pivxd
Step 9
The above command will begin downloading and processing the PIVX blockchain. This will require several hours, possibly 10 or more. Monitor and verify the running Masternode software by watching the tail end of the debug.log file. This log file holds a variety of debug and progress status messages that are generated while the software runs. (Do not be alarmed by recurring notices of networking warnings, which are common and generally recoverable.) Here is the command to watch the ongoing new activity of the log file:
tail -f ~/.pivx/debug.log
Wait either for the message “Sync has finished” or for the message that the block number at the top of the PIVX blockchain has been accepted. You can learn this block from a PIVX explorer like that at https://pivx.flitswallet.app/, where it is labeled “Last Block". When this check passes, your first Masternode software is running and current!
Installing and Configuring Software for the Second Masternode
Each instance of a Masternode wallet requires its own copy of the PIVX blockchain. Downloading the blockchain as was done for the first node above takes hours, and it is easier to just copy it after it is downloaded for the first wallet. This will be done here.
Step 1
Before copying, the process running the first wallet (pivxd) should be stopped with the following command:
cd ~/pivx-5.4.0/bin && ./pivx-cli stop
It may take a minute or so to stop. When it is finished, what is returned from the following command will not include pivxd as a running process (though it will contain the grep command itself):
ps -ef | grep pivxd
Step 2
Go to the .pivx data directory and delete the unneeded debug.log file:
cd ~/.pivx && rm debug.log
Step 3
Tar the data directory into a file named pivx.tar using this command:
cd ~/.pivx && tar cf ../pivx.tar *
This may take a few minutes because the data includes a copy of the large PIVX blockchain.
Step 4
Set up a new and separate data directory for the second Masternode as follows:
cd ~ && mkdir .pivx2 && cd .pivx2 && tar xf ../pivx.tar
With this, the new data directory for the second Masternode is named .pivx2.
Step 5
If there is a wallet.dat file present in .pivx2, it should be removed by issuing the following in the .pivx2 directory:
rm wallet.dat
Step 6
In the .pivx2 directory, edit the pivx.conf file to define parameters for the second Masternode using the vi editor or an alternative of your choice. This pivx.conf file should be the following:
rpcuser=<username>
rpcpassword=<password>
rpcallowip=::1
rpcallow=127.0.0.1
bind=<vpsip>:51472
rpcport=12346
server=1
daemon=1
logtimestamps=1
maxconnections=256
masternode=1
externalip=<vpsip>
masternodeaddr=<vpsip>:51472
masternodeprivkey=<privkey>
Note the change from before to rpcallowip, which is now configured for IPv6. Also, the value for rpcport has been incremented. The values for <username> and <password> can be the same as before. <vpsip> should be a new IPv6 address in IPv6 notation, usually ending in ::1, such as the following example: [1234:abcd:1234:abcd::1], including the square braces. This address will have been provided by Contabo when setting up the VPS (or can be found by executing ip addr at the Linux prompt).
In the pivx.conf template above, <privkey> should be a new private key generated using the SPMT software in a repeat of the process used for the first Masternode (or by just pressing the "Generate" button again and accepting the popup to delete the old one if the software is still open).
Step 7
Now a new instance of pivxd can be run using this configuration through the following command:
cd ~/pivx-5.4.0/bin && ./pivxd -datadir=/root/.pivx2
It is possible that the location of .pvx2, as indicated in the above command, will be different for you. You can check the location using the pwd command.
As with the first Masternode, you can watch the ongoing new activity through the log file:
tail -f ~/.pivx2/debug.log
Updating the PIVX blockchain for this Masternode will be fast because the bulk of the needed data was copied from the first Masternode.
Note that for the second Masternode, commands will need to explicitly include the Masternode's data directory. For example, to stop this second Masternode, the command would be the following:
cd ~/pivx-5.4.0/bin && ./pivx-cli -datadir=/root/.pivx2 stop
Installing and Configuring the Third and Fourth Masternodes
The third and fourth Masternodes require a slightly different process because they need new IP addresses that are not available by default. To configure these, the following steps can be followed:
Step 1
Configure new IPv6 addresses. With Contabo, you have free access to a virtually unlimited number if IPv6 addresses. But, when using Ubuntu 20.04, you will need to specially configure the additional IPv6 addresses using netplan to create the third and fourth Masternodes. This is done by first editing the file /etc/netplan/01-netcfg.yaml with an editor like vi to cut and paste the initial IPv6 address twice, then edit it to make new addresses. Start the editor with a command like the following:
vi /etc/netplan/01-netcfg.yaml
The line to edit is under network:ethernets:ens18:addresses: It will look like this (where the values of the x's will be unique to your configuration):
- xxxx:xxxx:xxxx:xxxx:0000:0000:0000:0001/64
Cut and paste this line, keeping spaces intact, to add the following two lines below the original:
- xxxx:xxxx:xxxx:xxxx:0000:0000:0000:0002/64
- xxxx:xxxx:xxxx:xxxx:0000:0000:0000:0003/64
Then save the file. When this is done, enter
netplan try
When prompted without errors to accept the new configuration, do so by pressing Enter
Step 2
Set up new data directories for the third and fourth Masternodes as follows:
cd ~ && mkdir .pivx3 && cd .pivx3 && tar xf ../pivx.tar
cd ~ && mkdir .pivx4 && cd .pivx4 && tar xf ../pivx.tar
Step 3
In each directory, if there is a wallet.dat file present, it should be removed by issuing the following from within the directory:
rm wallet.dat
Step 4
Edit the pivx.conf file in each new data directory as was done for the second Masternode above, but with <vpsip> set to an alternative (ending in ::2 and ::3) IPv6 address associated with your VPS instance and increasing the rpcport value sequentially (i.e., using rpcport=12347 and rpcport=12348). <privkey> should be newly generated using the SPMT software for each instance. Don't worry about discarding old private key values in the GUI once they have been captured into the pivx.conf file.
Note there will be fewer changes to make if the pivx.conf file from .pivx2 is copied as a starting template, but editing the original pivx.conf file in place also works.
Step 5
New instances of pivxd should be run using these brand new configurations through the following commands:
cd ~/pivx-5.4.0/bin && ./pivxd -datadir=/root/.pivx3
cd ~/pivx-5.4.0/bin && ./pivxd -datadir=/root/.pivx4
After completing these steps, the first two pivxd instances may be in a stopped state, which can be observed by running
ps -ef | grep pivxd
If so, you can restart them with the following commands:
cd ~/pivx-5.4.0/bin && ./pivxd
cd ~/pivx-5.4.0/bin && ./pivxd -datadir=/root/.pivx2
With this, you have configured the four-Masternode Contabo VPS. Though you will need your SSH interface open to gather some information, the remaining steps below will be run only on your personal computer.
Posting PIV to Start the Masternodes
You need 10,000 PIV for each of the four Masternodes. (If you don’t have this 40,000 PIV, you will need to buy it before continuing.) This example uses Ledger Live to control the funds. So, under that assumption, start by transferring exactly 10,000 PIV to each of four receive addresses for your Ledger.
You can configure receive addresses in Ledger Live by sequentially selecting “Add Account” in the Accounts page of Ledger Live to make a new PIVX account. After each account is created, you can learn its primary address by selecting to receive funds in that account and following prompts until the address is available. For each address, send exactly 10,000 PIV to it in a single transaction. Any other amount will not work to fund a Masternode.
After you have exactly 10,000 from a single transaction available on four different addresses in Ledger Live, take the following steps for each address using the SPMT tool:
Step 1
In the SPMT "Masternode List" tab, press the "New Masternode" button at the bottom.
Step 2
Copy the Masternode private key generated earlier from the pivx.conf file (on the Contabo VPS) for that Masternode into the "MN Priv Key" box.
Step 3
Name the node. In the “Name” box, enter any name meaningful to you. “PIVX01”, "PIVX02", "PIVX03", and "PIVX04" could be used in sequence, for example.
Step 4
Enter the Masternode's IP address into the "IP Address" box. This should be the same value used in the pivx.conf file for that node (IPv4 for the first Masternode and IPv6 for the others).
Step 5
Get the account number from Ledger Live for the address holding the 10,000 PIV. Every Ledger PIVX account has a number. This number is usually one less than the order they appear in the Ledger Live interface, so the first account is 0, the second account is 1, and so forth. Set the "Account" value to this number.
Step 6
Enter the PIVX address holding your 10,000 PIV for collateral into the "PIVX Address" box. This is the same as the receiving address used to hold the 10,000 PIV in Ledger Live.
Step 7
Capture the address's public key into the "Public Key" box through the following procedure: With the account number and PIVX address already entered, and with your Ledger connected to your computer, click the “>>” button to capture the public key from the Ledger. You will need to accept UI popups in this action. The reason for this step is that a PIVX address is made by hashing the account's public key in a process that is not reversible. So it is necessary to go back to the Ledger to get this information.
Step 8
Capture the ID for the transaction that sent your 10,000 PIV into the "txid" box by clicking the "Lookup" button to get it through a UI-interactive process. Additionally, in the usual case where the 10,000 PIV were sent in a simple transaction (one destination address for the 10,000 PIV and zero or one change address), the "txidn" (next to the "txid" box) will be 0.
Step 9
Click “Save” to save the information. Then click the rocket button next to the newly created Masternode entry in the "Masternode List" tab to launch it. This will require using your Ledger to sign one transaction that enables the Masternode with the private key controlling the 10,000 PIV. There is no fee associated with sending this transaction.
After completing these steps four times, you are now an operator of four new PIVX Masternodes! In a few minutes your new Masternodes will show as “ENABLED” in the SPMT software when you click the "Get Status of All Masternodes" button. And after a few days you will start earning regular rewards that will be deposited to the addresses holding your 10,000 PIV (but as different transaction outputs). And you can vote on active proposals. You are now supporting PIVX, earning rewards, and being cost effective!
Scripts
Scripts can be created to help manage the Masternodes on the VPS. These are text files having executable permission (using, e.g., chmod +x on the command line) that contain sequences of commands.
Here is an example script for starting Masternode #2 (just to pick one):
#!/bin/bash
cd ~/pivx-5.4.0/bin && ./pivxd -datadir=/root/.pivx2
exit
Here is an example script for viewing the status of Masternode #2:
#!/bin/bash
cd && tail -f ~/.pivx2/debug.log
exit
Here is a script for stopping Masternode #2:
#!/bin/bash
cd ~/pivx-5.4.0/bin && ./pivx-cli -datadir=/root/.pivx2 stop
exit
The above were illustrative scripts for managing a single Masternode. You may prefer to manage all Masternodes at the same time. Here is an example script to start all the nodes and possibly pass along another optional command (such as -reindex or -maxreorg):
#!/bin/bash
cd ~/pivx-5.4.0/bin
./pivxd $1
./pivxd -datadir=/root/.pivx2 $1
./pivxd -datadir=/root/.pivx3 $1
./pivxd -datadir=/root/.pivx4 $1
exit
These scripts can be put in files with meaningful names (like startmn2 or startall).
Acknowledgements
Thanks to PIVX community member Sparrow for providing advice and scripts for this article.
To Explore Further
Here are additional good online resources related to setting up and configuring PIVX Masternodes. These resources contributed to this article.
- The PIVX website has a page on setting up an single-core IPv4 Masternode using Digital Ocean. https://docs.pivx.org/masternodes-andgovernance/masternode-digital-ocean
- Cave Spectre wrote an article about setting up multiple Masternodes for GambleCoin on a vultr VPS that has applicability to PIVX. https://medium.com/@CaveSpectre/multiple-masternodes-one-coin-one-vps-a72832ad5f0e