By Yenachar – November 16, 2022
Pre-built PIVX executable files are available for quick installation on most popular platforms. Yet there are still good reasons to want to compile the PIVX software yourself. You may want the confidence that comes from working only with the human-readable source code, want to run PIVX on an unusual platform, want to learn about the PIVX source and development process, or want to help improve the PIVX software. This article will describe how to compile and debug the PIVX Core software under Linux working from a Windows computer.
Background
The PIVX source code is not currently built under Windows. Instead, binary executable files for Windows are compiled using Linux. One day PIVX may build natively under Windows using a compiler like Visual Studio, but in the meantime, if you are running a Windows computer you will need to work with Linux.
There are many ways to run Linux from your Windows computer. It can be run natively on a disk partition, inside a Virtual Machine (VM), inside a container, on a remote host, or as part of the Windows Subsystem for Linux (WSL). This article has applications to all these methods, but will specifically use an Ubuntu Docker container. It will go through the process of setting up and configuring the container and downloading, compiling, and debugging the PIVX source in that container, including using a graphical Integrated Development Environment (IDE). The IDE used in the example will be CLion from JetBrains.
IDEs like CLion support a process called remote development, where the Graphical User Interface (GUI) is run on one platform, like Windows, while the compiler runs on a separate platform like Linux. For this article, however, debugging—both running the compiler and interacting with the GUI—will be done on Linux, which will match how it would be used natively. The goal is to make the approach in this article mostly transportable to other methods of running Linux.
Running Linux in a Container
This example will use Ubuntu Linux, version 20.04. Ubuntu is free, user-friendly, customizable, and widely used. The techniques will mostly extend to other versions of Linux (such as Fedora).
Ubuntu Linux can be installed in a Docker container. Containers are compartmentalized like VMs, but less decoupled from the Windows environment and generally easier to use. Developing under Docker containers is increasingly popular.
Start by installing Docker Desktop (version 4.10.1 was used in this example) on your Windows computer. Docker is free for individuals and can be downloaded here: https://docs.docker.com/desktop/install/windows-install/. When installing, the “Use WSL 2 instead of Hyper-V” box can be left unchecked, as was done when creating this article.
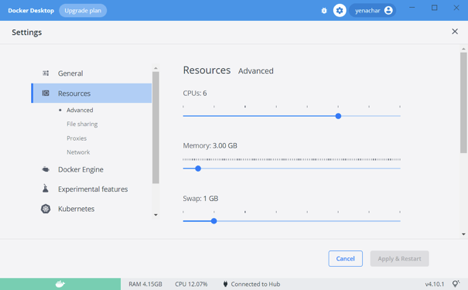
The following specifications are recommended for building and running PIVX Core under an Ubuntu Linux 20.04 container:
6 CPUs (more is better)
100 GB storage
3 GB RAM (with 1 GB Swap)
Here are the settings you will see with this configuration in the Docker Desktop:
To create an Ububtu-based container for building PIVX, open either a standard command prompt or Windows PowerShell and type the following:
docker run -it --entrypoint "/bin/bash" ubuntu:20.04
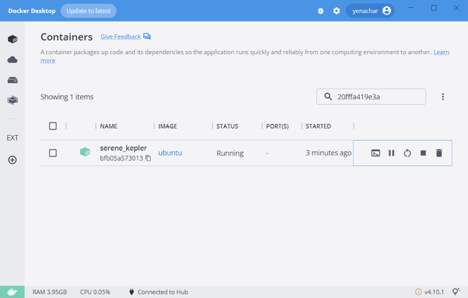
After running this command, you will be able to see your container in the Docker Desktop, as shown below (the shown name “serene_kepler” is random and automatic—your container’s name will be different). This graphical interface allows you to start the container, using the solid arrow button, and stop it, using the solid square button. It also allows you to open any number of command terminals, using the prompt-in-a-box button.
Configuring Linux
From the Docker Desktop, start your container if it is stopped or paused and open a command window by pressing the “OPEN IN TERMINAL” button (showing as a prompt inside a box). The terminal window, after, for example, an “ls” command, will look like the following:
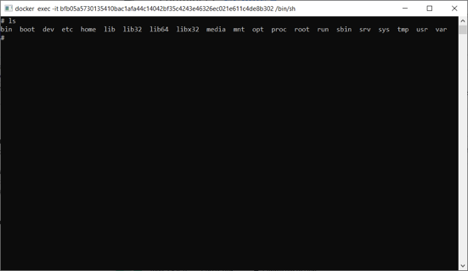
This command terminal will be used to configure the Docker container to download and build the PIVX source code. Downloading the required files will be done mostly using the APT package manager under Ubuntu.
Note that if you were working with stand-alone Linux, it would typically require the permissions that come with the sudo command for many installation operations. This, however, is not required (and in fact will not work by default) with the Docker container just created under Windows. Because of this, the installation commands in this article to do not use sudo. If you are using a different Linux environment, though, it might be needed in front of the commands below.
With these points in mind, to configure your Linux container for building PIVX source, start by installing the version control software Git through the following commands:
apt update
apt upgrade -y
apt install git -y
Then use Git to download the PIVX source with the following command to download the working PIVX codebase:
cd ~ && git clone https://github.com/PIVX-Project/PIVX.git
For this article, the Autotools build system will be used. Download some necessary helper tools for this approach through the following commands (note the first set will prompt you for your geographical location and time zone during installation):
apt install build-essential libtool bsdmainutils autotools-dev autoconf pkg-config automake python3 -y
apt install libgmp-dev libevent-dev libboost-all-dev libsodium-dev cargo -y
Next install curl, a library that supports network communication:
apt install curl -y
For basic editing and testing, you will want a text editor, and can install the software of your choice. For example, vim, an enhanced version of the simple editor vi, can be installed with the following command:
apt install vim -y
To display graphics, X11 will be used to send the GUI information to the Windows computer you are using. To enable this, issue the following command within the Docker container:
export DISPLAY=host.docker.internal:0
In other environments, the above step will look different. For example, you can also type “ipconfig” in a Windows command window on your computer to get your IP address and use that in place of “host.docker.internal” above. If you are running bash, the above line configuring DISPLAY can be added to your .bashrc file to automatically configure it for future use.
With this setting, your Linux container will send GUI information to your Windows computer, which will be set up in the next section to receive and process this information.
Configuring Windows
To allow X11 GUIs to run on your Windows computer, you can install VcXsrv. It can be downloaded from SourceForge here: https://sourceforge.net/projects/vcxsrv/. After downloading and installing, run the application, which can be configured by accepting the defaults in the configuration dialog.
If you will be running or developing regularly, you may want to automatically start VcXrv whenever the Windows computer runs. This can be done by following the instructions here: https://support.microsoft.com/en-us/windows/add-an-app-to-run-automatically-at-startup-in-windows-10-150da165-dcd9-7230-517b-cf3c295d89dd.
Building
Many libraries needed to build the PIVX code can be built from a configuration that is part of the Git PIVX repository rather than individually downloaded from their various origins. They are organized for building inside the ~/PIVX/depends folder. To make these dependencies, issue the following command:
cd ~/PIVX/depends && make
Also, install libraries for building the PIVX GUI using the following command:
apt install libqt5gui5 libqt5core5a libqt5dbus5 libqt5svg5-dev libqt5charts5-dev qttools5-dev qttools5-dev-tools libqrencode-dev -y
The above installation will require input from you—you will be prompted for information on your keyboard type.
Next, for enabling the PIVX wallet, you need Berkeley DB. To install DB 4.8, issue the following commands:
apt install software-properties-common -y
add-apt-repository ppa:pivx/pivx -y
apt install libdb4.8-dev libdb4.8++-dev -y
Now it is possible to build the PIVX code, including the PIVX daemon pivxd and the GUI wallet interface qt-pivx with the following commands:
cd ~/PIVX && ./autogen.sh
./configure
make
make install
The last line above (make install) installs documentation and places executables in a central location where they can be accessed from anywhere.
Upon completion, the software this builds is almost ready to run. Before running, the sapling parameters that are used by PIVX’s cryptographic algorithms should be installed using the following command:
cd ~/PIVX/params/ && ./install-params.sh
This will only need to be done once for your Docker container.
After this, you can try running pivxd with the following command:
pivxd
This will start downloading the PIVX blockchain. Alternatively, run pivx-qt for an interactive GUI wallet with the following command:
pivx-qt
(If you see network connection problems, you may need to allow communication through your Windows firewall or antivirus software.) For pivx-qt, the GUI should show on your Windows computer. You have now built PIVX software from source!
Building for Debug
For debugging, compilation configuration parameters need to change. Reconfiguring to include debug information and recompiling in this mode can be done with the following commands:
cd ~/PIVX && make clean
./configure -enable-debug
make
make install
Basic Debugging
The easiest way to debug the PIVX software is by editing the PIVX source files to add print statements that go to the log file. For example, you can add the following to the ProcessNewBlock() function in file validation.cpp (using, for example vi ~/PIVX/src/validation.cpp):
LogPrintf("@NEWBLOCK@");
Then running pivxd you can see this output using
~/PIVX/src/pivxd | grep @
You can also see it in the debug file:
cat ~/.pivx/debug.log | grep @
The next level of debugging after print statements is using a text-based debugger like the GNU Project Debugger, GDB (discussed here: https://sourceware.org/gdb/). This debugger allows you to set breakpoints and other conditions for stopping and to access and change variable values while running. GDB can be added to your container through the following command:
apt install gdb -y
The gdb debugger runs inside its own shell. This shell can be started with a command like the following to analyze pivxd:
cd ~/PIVX && gdb src/pivxd
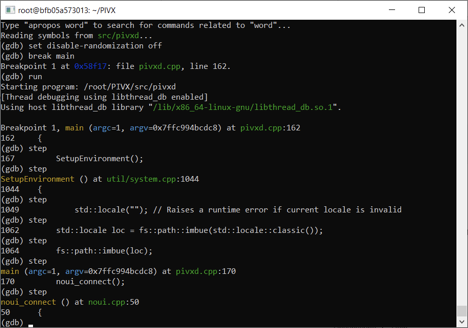
After running this, inside the GDB shell, you can explore the PIVX code. For example, you can walk through the start of pivxd by setting a breakpoint at the main() routine, then stepping line by line through it.
Note that with a container, it is necessary to accept Linux address space randomization to avoid a warning. These steps can be performed with the following sequence of GDB commands:
set disable-randomization off
break main
run
step
step
…
step
Here is a screen capture illustrating the results of these commands:
Building in the CLion IDE
Many developers prefer debugging in an IDE, where breakpoints can be set and data accessed graphically. A well-regarded IDE for C++ that runs under Linux is CLion from JetBrains. Long term use requires purchase, but trial usage is free.
CLion can be downloaded and installed from a Firefox or other browser running in the Linux container. To download Firefox, use the following command:
apt install firefox -y
After this installation, typing “firefox” at the command prompt will run Firefox on the Linux container and show the GUI on your Windows computer. After starting Firefox, go to www.jetbrains.com -> developer tools -> CLion -> Download, then download the CLion software as a .tar.gz file (named CLion-2022.2.tar.gz or similar, depending on the latest version number).
After downloading, issue the following command (replacing the filename with the one you just downloaded, if different) to install CLion:
cd ~/Downloads && tar xzf CLion-2022.2.tar.gz -C /opt
To prepare for CLion, issue the following commands:
cd ~/PIVX && make distclean
./configure
Then to start CLion, run
/opt/clion-2022.2/bin/clion.sh
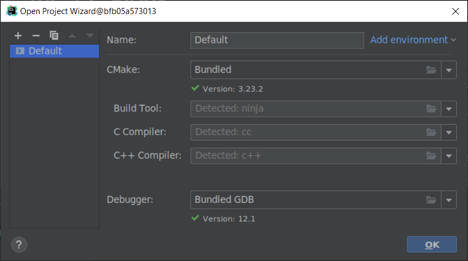
If the wizard does not start automatically, you can start it by navigating in the GUI to ~/PIVX and taking the Makefile option (instead of CMake project option). You will have Wizard options as shown below, which you can accept:
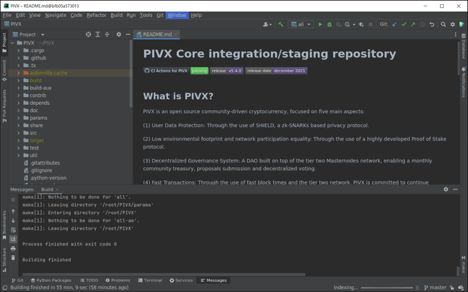
After loading, you will see an initial main GUI that appears as follows:
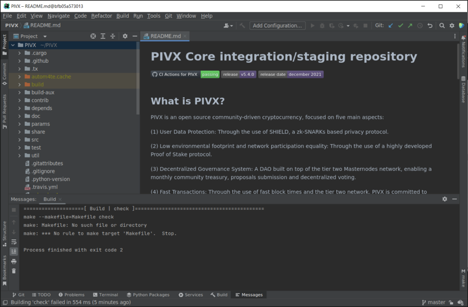
Don’t worry about any initial error messages. The build parameters need to change, and this can be done by navigating to File -> Settings -> Build, Execution, Deployment -> Makefile and clearing the Build directory, Pre-configuration commands, and Build target text boxes. The menu will look like this:
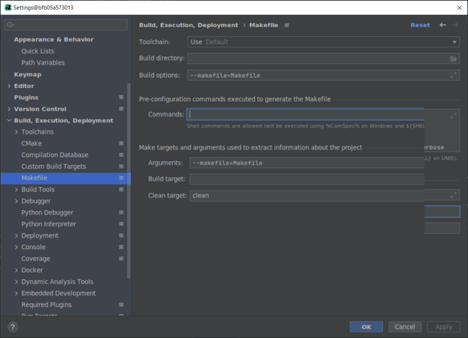
After clicking OK to change the settings in the above dialogue, you are ready to build inside the CLion GUI. To do this go to Build->Build Project in the main GUI. This will build the PIVX core software within the GUI. The result will appear like the following:
Debugging in the CLion IDE
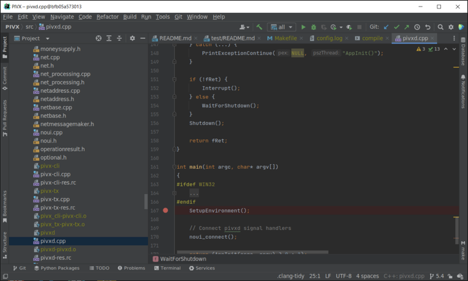
The CLion IDE allows interactive debugging. To see a simple example, you can open the file pivxd.cpp (from the src directory) and place a breakpoint at the first line inside the main() function. This is illustrated in the figure below:
With this breakpoint set, configure the debugger to run pivxd by going to Run -> Edit Configurations and entering pivxd as the executable and src as the working directory. Here is how the dialog will appear:
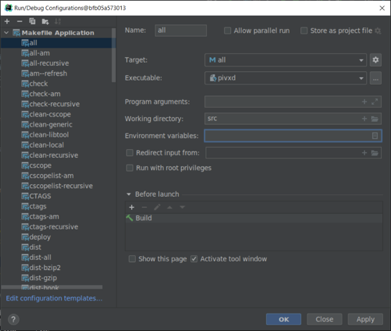
With these settings, click the OK button at the bottom, and you are ready to debug. Start the Debugger by going through the menu to Run -> Debug “all”. This will run the program pivxd and stop at the breakpoint you created. The appearance will be similar to the following:

This shows where you are in the program and gives values for variables in the context of your breakpoint. From this interface, you can step through the program and observe its functioning using the blue and red step buttons shown in the left middle above. And you can set other breakpoints and change variable values.
Optional Developer-Environment Additions and Steps
The Docker container as set up above does not include all the features one might expect in a development environment. Here are some optional steps you may wish to take to better engage in PIVX software development.
You can restore the minimized Docker image to a full system for development that includes items like man pages through the following command (which will take several minutes to complete):
unminimize
You may want to get port mapping libraries:
apt install libminiupnpc-dev libnatpmp-dev -y
If ZeroMQ libraries are present, running ./configure during the build process builds the ability to communicate over ZeroMQ sockets, which can be useful for some applications. To download these dependencies and provide the ZeroMQ API, run the following:
apt install libzmq3-dev -y
To view MD files with formatting (outside of CLion), which can be helpful for viewing PIVX documentation, you can install retext:
apt install retext -y
You may want IP utilities, like ip and ping to analyze network communications:
apt install iproute2 -y
apt install iputils-ping -y
To avoid common X11 warnings about an inability to register with the accessibility bus, you may want to run the following in a command console or otherwise add it to your environment (such as through ~/.bashrc if you are running bash).
export NO_AT_BRIDGE=1
To change the branch you are building to a different version of the software, you may want to first see what branches are available through the following command:
cd ~/PIVX && git branch -a
then switch to the branch of your choice using a command like the following (replacing 5.4 with your preference):
git checkout 5.4
With this type of change, you can run the make command as described above to build the software of the specified branch.
Acknowledgements
Thanks to PIVX community member Sparrow for reviewing this article.
To Explore Further
Here are some additional good online resources that contributed to this article and add additional information.
The PIVX GitHub repository has a good article made by multiple contributors on building under Unix-type operating systems, https://github.com/PIVX-Project/PIVX/blob/master/doc/build-unix.md.
This 2020 article by Spencer Pollock gives information on setting up an Ubuntu Docker container, https://medium.com/swlh/setting-up-an-ubuntu-20-04-docker-container-c74a873d26c8.
This 2018 article by Robin Kretzschmar describes how to run a GUI app in a Linux Docker container under Windows: https://dev.to/darksmile92/run-gui-app-in-linux-docker-container-on-windows-host-4kde.
These tips from Fabian Jahr on debugging the Bitcoin code have applicability to PIVX: https://gist.github.com/fjahr/2cd23ad743a2ddfd4eed957274beca0f
PIVX community member Fuzzbawls wrote a description of the optional use of ZeroMQ in PIVX, available here: https://github.com/PIVX-Project/PIVX/blob/master/doc/zmq.md.